These pages are provided to my students and close clay friends. Please do NOT put these links out on social media! While I realize that this is still a public page, it’s really for our use only. THANKS
Many of you are aware of my background as a professional photographer for over 40 years. I actually have a Science Degree in Photography from Brooks Institute of Photography (which was the best school in the world at the time. RIP Brooks)
While we were at school we had the best equipment to work with, but we were also taught how to shoot professional photos with stuff from around our house. We were also taught to “get it in the camera” – make the photo as technically perfect as possible in the exposure to cut down on post-processing procedures (time is $$ folks). I remember my tape deck was stolen from my car (we are talking the 70s people). The police asked me if I knew what it looked like. I ran in the house and brought out a mounted 16×20 catalog shot of my tape deck. The cop shook his head and muttered, “You Brooks kids..”
ANYWAY – I don’t shoot with fancy stuff – even though I own a LOT of it. I shoot mostly with my Samsung Galaxy phone and a sheet of white poster board. Lemme show you.
This blog is all about EXPOSURE. Your fancy cameras and phones still meter light the same as my old hand held light meters do. They meter the light to as close to 18% grey as they can. So when you shoot on a WHITE background, the camera meters the entire scene to as close to 18% grey as it can. The result – a slightly grey, low contrast image (even worse in light boxes). The opposite is true is you shoot on a BLACK background. We’ve all tried to shoot on black velvet – and we get a dark grey with every single bit of lint and cat hair that we can’t even see, RIGHT?
So we need to manually adjust our exposure. On most phones (and many cameras) when you point your lens at the scene you can touch the screen on the image to select focus. Almost ALL phones/cameras will also bring up a tiny little vertical scale when you touch the screen that is marked with either a light bulb or a sun. That is your manual exposure! You touch the slider and move with your finger to lighten or darken the image. When we shoot on white or light backgrounds we have to adjust the exposure to add MORE light. When we shoot on black, we need to adjust the exposure to remove some of the light. Let me show you what I mean..

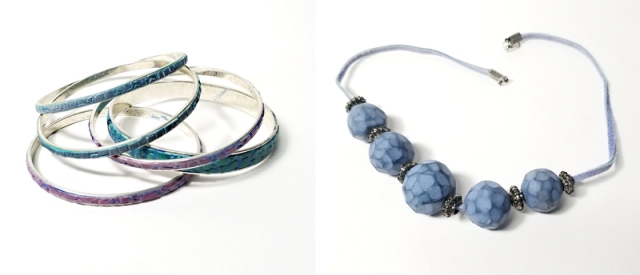
The left image is how the camera wants to meter the exposure. The second exposure on the right is my corrected exposure. The little square in the middle is 18% grey.
I hear you saying, well that’s fine for a small flat image but what about something with more depth, then I need a light box right? NOPE Remember that the first screen touch will also set focus, this will effect what is called the Depth of Field or the area of focus. I may talk more about that in a later post, but for now, see how the focus is sharp on the beads to the right and slightly out of focus at the back closure? That’s because I chose the beads to be the focus (duh) and not the closure.
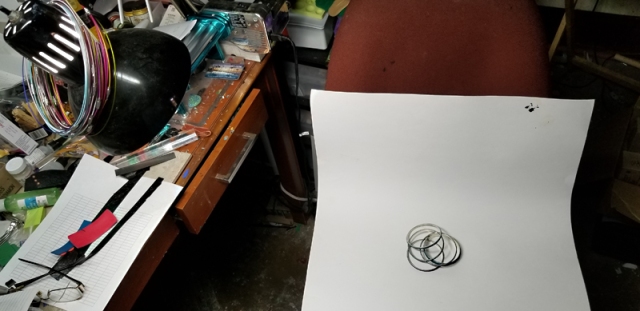
So what is my setup to make these shots? A white poster board bent on my work chair to form a curve (called a seamless background or a sweep in the Industry). I swing my work light over to cast light. I like the light shadows I get, otherwise I would just hold a sheet of white paper on the other side to reflect the light back into the shadows (this was my kids jobs when they were little). I also have a small hand held light I can use to bring light in from the opposite side. (Classic copy stand setup is two equal lights set on either side of the shoot area with the lights aimed at 45 degrees.)

See? Just a poster board on my chair and you can see the corner of my light in upper left side of the frame.
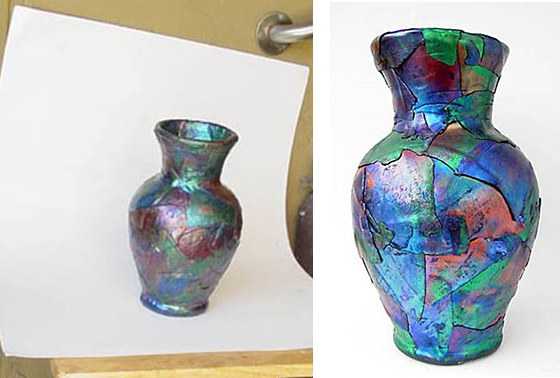
So how do I photograph larger items? Same set up! I often will shoot outdoors in light open shade (watch for “blue” shadows) using a TV tray against a wall that is not in direct sunlight.
All I needed to do in post processing is make sure that the vase was straight (it was a 3 legged table I used for YEARS until I upgraded to a table with 4 legs. Don’t ask me why..) AND I always add a little color saturation to items with Pearl X. They tend to grey out in photos.
Got catalog shots to do? This method makes it quick and easy. Just crop and go.
Oh! One more thing – if you DO use a light box, you can trim a poster board to create a mini-sweep in your light box to help keep a seam from showing in the back of the box. Just make sure to ADJUST THAT EXPOSURE!
xoxo, syn


